windows update with error code “ code : 646 windows update encountered an unknown error” on windows vista or windows 7
Then please follow the below steps :
Step 1: Turn off UAC (use MSCONFIG)
============================
1. Click Start. Type MSCONFIG in the Start Search bar and press Enter.
Note: If UAC window prompts for permission to continue, please click Continue.
2. Click Tools.
3. Highlight Disable UAC, click Launch.
4. Restart the computer and test the issue again.
Note: If you turn on UAC, please launch Enable UAC
If the steps do not work, let's refer to the following steps to manually download and install the updates.
Manually download and install updates
**************************
or ,
1.Click Start, and then in the Start Search box, type regedit.
2. In the Programs list, right-click Regedit.exe, and then click Run as administrator. If you are prompted for an administrator password or for confirmation, type the password, or click Continue.
3. Locate and then click the following registry subkey:
HKEY_USERS\.DEFAULT\Software\Microsoft\Windows\CurrentVersion\Explorer\User Shell Folders
4. In the details pane of Registry Editor, locate AppData. The value of this key should be %USERPROFILE%\AppData\Roaming.
5. If the value is not set to %USERPROFILE%\AppData\Roaming, right-click AppData in the details pane, and then click Modify.
6. Enter %USERPROFILE%\AppData\Roaming into the Value data box, and then click OK.
7. Close Registry Editor.
8. Try to install the update again. If the problem persists, repeat these steps but use the following registry subkeys instead of the subkey that is specified in step 3:
HKEY_CURRENT_USER\Software\Microsoft\Windows\CurrentVersion\Explorer\User Shell Folders
HKEY_LOCAL_MACHINE\Software\Microsoft\Windows\CurrentVersion\Explorer\User Shell Folders
Now perform the windows update.

Technical Knowledge
Wednesday, June 16, 2010
Tuesday, June 15, 2010
SAP Issue
Any SAP Installation issue please check :
http://blog.sqlauthority.com/2008/06/12/sql-server-2008-step-by-step-installation-guide-with-images/
http://blog.sqlauthority.com/2008/06/12/sql-server-2008-step-by-step-installation-guide-with-images/
Monday, March 1, 2010
Windows Update error : 80244019
If you get the Windows update error 80244019
Then follow the below steps :
Go to HKEY_LOCAL_MACHINE\SOFTWARE\Policies\Microsoft\Windows\WindowsUpdate\AU
Then selecting dword value:
"UseWUServer"=dword:00000001"
and change the value to 0.
Then reboot.
After Reboot run the windows update Issue will get resolved
Then follow the below steps :
Go to HKEY_LOCAL_MACHINE\SOFTWARE\Policies\Microsoft\Windows\WindowsUpdate\AU
Then selecting dword value:
"UseWUServer"=dword:00000001"
and change the value to 0.
Then reboot.
After Reboot run the windows update Issue will get resolved
Sunday, January 10, 2010
How To Create a Windows 7 Homegroup
HomeGroup takes the headache out of sharing files and printers on a home network. Connect two or more PCs running Windows 7, and HomeGroup makes it easy to automatically start sharing your music, picture, video, and document libraries with other people in your home.
Creating your HomeGroup
Click the Start button or press the Windows key.
Start Menu > Control Panel > Select Network and Internet, Choose “Homegroup and Sharing Options.” > click the button labelled, Create a Homegroup.
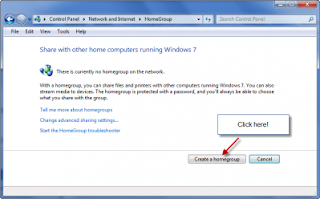
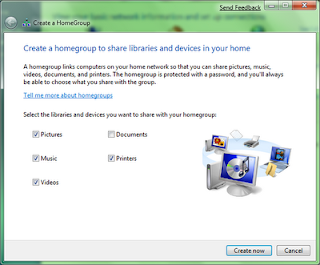
The “Create a Homegroup” window opens, displaying the features you can share – Pictures, Documents, Music, Printers and Videos.Check the boxes for those items you wish to share.Click the Next button.
The wizard then generates a password which can be used to add other computers to your HomeGroup
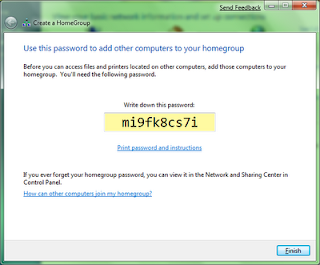
Click Print password and instructions.
Give the Password information sheet to the other computer user(s).
Click the Finish button.
Your new HomeGroup is now created and your Pictures, Music, Videos, Printers folders are ready to be shared with other computers when they join this HomeGroup. These folders - Music, Videos, Printers, Pictures - are called as your Libraries in Windows 7.
Joining HomeGroup
Click the Start button.
When the Start Menu opens, Homegroup.
The Change Homegroup settings window opens indicating that another computer is on the Homegroup network. It also shows that there are shared Libraries and Printers.
Click the Join now button.

The Join a Homegroup window opens. You need the Homegroup Password to join.

Type in the Homegroup Password.
Click the Next button
Windows 7 informs you that you Welcome to your HomeGroup!
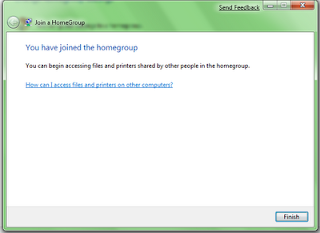
Click the Finish button.
Viewing your HomeGroup
Click the Start menu.
Select Homegroup.

The Homegroup window opens.
Click Homegroup
HomeGroup was certainly designed for ease and it does stay true to its promise - An easy end-to-end approach to sharing in your Home!
Creating your HomeGroup
Click the Start button or press the Windows key.
Start Menu > Control Panel > Select Network and Internet, Choose “Homegroup and Sharing Options.” > click the button labelled, Create a Homegroup.

The “Create a Homegroup” window opens, displaying the features you can share – Pictures, Documents, Music, Printers and Videos.Check the boxes for those items you wish to share.Click the Next button.

The wizard then generates a password which can be used to add other computers to your HomeGroup

Click Print password and instructions.
Give the Password information sheet to the other computer user(s).
Click the Finish button.
Your new HomeGroup is now created and your Pictures, Music, Videos, Printers folders are ready to be shared with other computers when they join this HomeGroup. These folders - Music, Videos, Printers, Pictures - are called as your Libraries in Windows 7.
Joining HomeGroup
Click the Start button.
When the Start Menu opens, Homegroup.
The Change Homegroup settings window opens indicating that another computer is on the Homegroup network. It also shows that there are shared Libraries and Printers.
Click the Join now button.

The Join a Homegroup window opens. You need the Homegroup Password to join.

Type in the Homegroup Password.
Click the Next button
Windows 7 informs you that you Welcome to your HomeGroup!

Click the Finish button.
Viewing your HomeGroup
Click the Start menu.
Select Homegroup.

The Homegroup window opens.
Click Homegroup
HomeGroup was certainly designed for ease and it does stay true to its promise - An easy end-to-end approach to sharing in your Home!
Subscribe to:
Posts (Atom)